Agentic A/B test Development - a look into our A/B test automation process


In the age of “Agentic Engineering,” how can we automate A/B test development? With agents writing the code, the difficult part is no longer the coding itself. The attention shifts towards understanding the exact requirements, feasibility checking, investigation, optimization, and pixel-perfect UI creation. The purpose of this blog is to showcase how we automated our A/B test development process while maintaining the balance between vibe coding and human intervention.
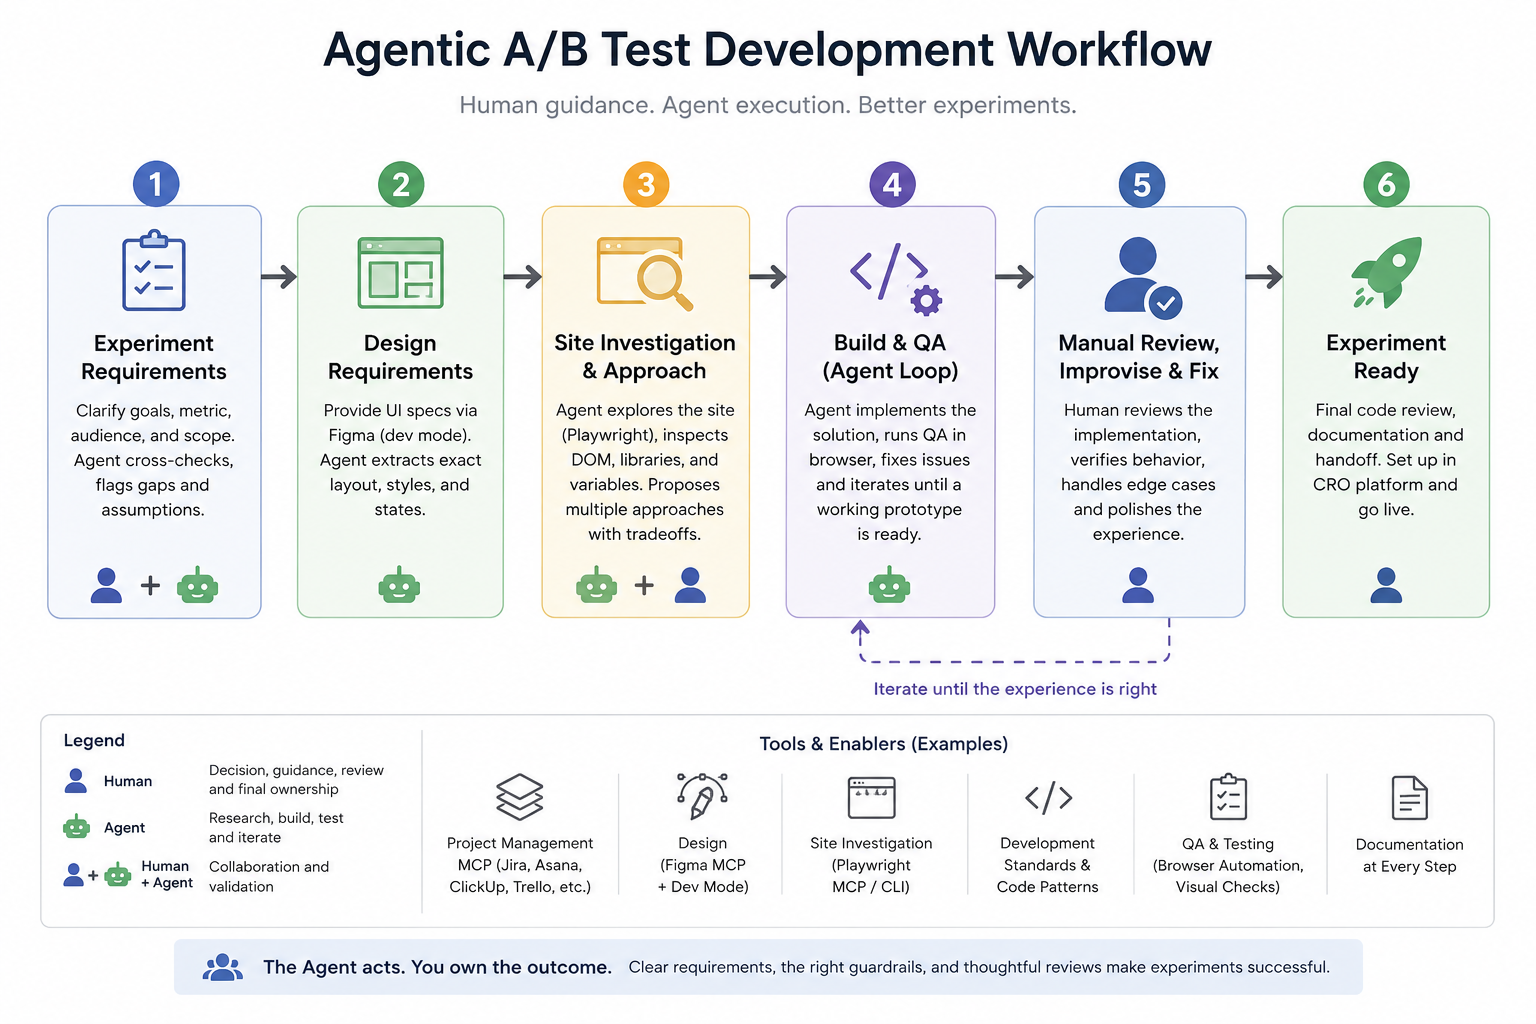
Here’s a roadmap to automate the A/B test development process as a whole.
1. Experiment Requirements:
The most important part is delivering the proper requirements to the AI agent. The agent can use a skill to cross-check the requirements, find any gaps or contradictions, flag assumptions, and clarify them with the developer.
This step requires human intervention to ensure that the agent has a clear understanding of the experiment requirements, that all required information is provided, and that no false assumptions are made.
You can use MCP servers for your Project Management Software (PMS), such as Jira, Trello, ClickUp, Asana, Airtable, etc., to access ticket information directly.
2. Design requirements
With the requirements clarified, hand over the exact UI specifications to the agent. You can use Figma MCP with Figma Dev Mode. If Figma is not available, screenshots can be provided, but in that case, extra effort will be needed to explain the expected changes and scope.
For the best result, you’ll need Figma MCP with Dev Mode access. The agent will then be able to run through each frame, understand the design requirements, and retrieve exact layout and CSS properties. For simple and mid-level complexity designs, this should be enough.
For complex, multi-state designs, either the designer or the developer needs to put in some effort to mark the states and the changes made. It’s nice if the designer does this after completing the design. Otherwise, the developer can refer to the Figma frames and instruct the agent with the relevant information.
3. Site Investigation and Development Approach
Using tools such as the Playwright CLI or MCP, you can allow the agent to gather relevant context by exploring the website for the existing DOM structure, third-party packages, exposed variables, etc., related to developing the experiment.
After exploring the site, the agent provides a clear plan based on its findings and suggested development approach. The agent can offer multiple development approaches with trade-offs between them.
The human intervention here is to go through the agent’s findings and make sure the agent is not going in the wrong direction. Check the proposed development approach and whether it follows standard development principles, along with its pros and cons.
4. Build & QA
If you have already reviewed the development approach and are confident that the agent is on the right track, you can let the agent run with browser (Playwright) access.
You can have QA integrated into this step as well. The agent can execute the implementation and run its own QA loop with browser access. It will complete the initial development, perform QA, fix issues, and iterate.
Hopefully, you’ll have a working prototype ready to work on.
5. Check manually, improvise and bug fix
The human intervention in this step is a whole separate step. This can be the largest or the tiniest step in the whole workflow.
If the model is good enough to process the context and your instructions are sound, this step will be as simple as checking whether the A/B test is working and doing a quick code review, as you have already validated the development approach yourself.
In the worst case, the model mixes things up and you have to work from the ground up. But this rarely occurs, as the only autonomous task the agent performs is writing the code, and that is done with a pre-approved plan.
Mostly, you’ll fall somewhere in the grey zone. While most of the features work, a small portion (10–25%) will have bugs, and you can solve them either through prompting or manually, whichever you prefer.
Results & Impact
We get around 30% improvement using the agentic workflow. That’s the conclusion; now let’s get into the details.
Let me explain with an A/B test estimated at 15 hours. Here’s a rough breakdown.
Traditionally, we investigate for an hour, develop for 8–10 hours, and spend 1 hour on tool setup and pre-QA. That leaves around 3 hours for bug fixes.
With agentic A/B development, plan generation and verification take around 1–2 hours. (It’s a bit difficult to read so much generated text.) Initial agentic development takes around 30 minutes–1 hour. Manual verification and fixes take 4 hours. And tool setup takes one hour. That leaves around 7–8 hours remaining.
The problem is, you’ll need a bit more time for bug fixes because, of course, the code is AI-generated, and fixing the bugs takes slightly longer if you fix them manually.
Or you can even use an agent for bug fixes, but you have to be extra careful to observe the changes the agent makes so that fixing one bug doesn’t introduce another.
The bug-fixing step can take somewhere between 3–6 hours. With that, in the end, you can save around 3 hours easily.
Initially, the whole process may seem a bit daunting and may even make it take a bit longer to deliver tests. Reading so much text about development approaches, site investigation, verification, and so on. Then comes understanding AI-generated code on top of that.
But if you have patience and get familiar with the process, you can even achieve optimization ranging between 30%–80%, depending on test complexity.
For simpler tests, the agent will be able to build almost the whole thing itself. And as the complexity rises, the quality of prompts and task delegation determines how much ground the agent can cover itself.
Once you get habituated to reading docs, understanding AI-generated code, and seeing how the agent handles several scenarios, you’ll eventually get a grip on maintaining the balance between blindly trusting the agent and knowing when to intervene.
Setting up your own workflow
This can be a bit daunting. It’s not like you can just say “do it” and it gets done. You can use various features and tools, such as commands, skills, subagents, rules, etc., offered by the harnesses, e.g., Cursor, Claude Code, etc., to adjust your workflow.
You can have skills for site investigation explaining what you want to prioritize, the red flags, the output pattern; a skill for code standards so the agent knows your development preferences, commonly used patterns, utilities, etc.; subagents to explore the existing codebase, find relevant patterns, and present a report; and rules to define your core development ideology. And so on.
You can set up your workflow in so many ways. You just need to get to know the existing harness features and test them.
For example, let’s talk about bug fixes. You can make it a skill or a command. Maybe both: a skill for generic fixes and a command for more focused, complicated fixes.
It depends on how you prefer to work, how the client communicates, the existing workflow, the available tools, and, most importantly, which approach ensures the best output for the team.
It doesn’t even have to be a one-time setup. Make a setup, build some experiments, realize the gaps, work on them, and iterate. And soon enough, you’ll have a setup of your own.
Some useful notes:
- It’s better if your workflow generates docs across each step. Docs for AC understanding, UI specification, site investigation, dev approach, run time issues, QA. And when AI generates the results, you can go through these to understand if the agent has proper understanding, where the gap remains and where the workflow fails. This will help you understand and debug your codebase after the agent drops in hundreds of lines of code all of a sudden. Also, to improve the workflow.
- Being an LLM, it’s very good at implementing logic and creating, but not very good with large Figma data extraction and QA; tends toward delivering quickly and ignoring nitty-gitties. And longer the context, higher the negligence rate. And at this point, it's the dev's responsibility to cover up the gaps in this step and make sure the agent has a decent enough understanding.
- You can even maintain a knowledge base for your agent consisting of client specific info, website specific info, critical roadblocks, development preference etc. With proper indexing the agent will know which data to access in which situation. You can make the knowledge base self-improving or closed for manual upgrades. Both have tradeoffs. In our case, we found the models smart enough to detect several key insights without maintaining a dedicated knowledge base. On top of that, A/B test control (and any other active sites) update very often. As a result, documented info about the site in the knowledge base may prove to be wrong due to control update or overlapping tests. In such cases, the agent may start navigating in the wrong direction and finally the dev will have to investigate himself to provide the correct context anyway. It can be useful if control updates are stable and you can sync the knowledge base accordingly. Unless maintaining a knowledge base is not worth the effort from A/B test perspective.
- We could attempt integrating the tool setup into the workflow using CRO platforms API or even create MCP if needed. But we abandoned that idea. Managing the CRO platform is not something we want the agent to have freedom with. Even with strict guardrails and custom made MCP, we did not want to automate the tool setup process. The agent acts but you own the outcome. When damage happens, you can’t blame it on an agent. So, it's not what the agent can’t do that should set the boundaries but what you want the agent to do and what not to touch.
- A bad side is, when AI writes code, your skills deteriorate. But you can play an uno reverse. You can rather check the advanced and unknown functions AI uses, learn about them and try to implement them in similar use cases in future. This allows you both the opportunity and time to gain more technical knowledge that would be rather difficult. AI is an amplifier, after all. You decide the input.
Thank you for coming this far. Hope you could gain some valuable insights you can try around. Best wishes.